Click here for a printable version of this page

Having 14 gallons of safe, clean water per person is the foundation for emergency preparation.  This provides a life-sustaining two-week supply of water should the municipal supply be interrupted by disaster.

Number of people in household  x 14  =  Number of gallons to be stored

Options for storing water:

  1. A simple solution: Commercially bottled water in 1 gallon PETE 1 plastic containers (not HDPE 2 like those used as containers for milk) 
  • Both the International Bottle Water Association and the U.S. Food and Drug Administration (FDA) consider commercially bottled water to have an indefinite shelf life as long as it is properly stored (room temperature, away from light and chemicals) and remains unopened.
  • Gallon jugs of water usually come packaged in heavy cardboard boxes which are opened by the grocer before the water is placed on the shelf.  By asking to purchase the water in the boxes you can stack water for more compact storage.  (Follow directions on box for how high the boxes may be stacked.)
  • Gallon jugs or boxes of jugs fit easily across the back of closets under hung clothing.
  • Gallon jugs are easy to lift and use when needed.  This size bottle will be used more quickly, an advantage when refrigeration is not available.

2.   Do it yourself water storage. 

  • Containers:  Hard plastic containers in which you may store 5, 15, 30 or 55 gallons of water are sold at camping and preparedness stores.  (See Emergency Preparedness Resources page.)
  • Second hand containers:  Use only food-grade containers.  Empty soda or juice containers with lids work well.  (Do not use milk containers or those previously used to store toxic substances.)

The Center for Disease Control gives the following directions

  • Preparing the containers:
    Thoroughly clean the bottles with dishwashing soap and water, and rinse completely so there is no soap residue.  Sanitize the bottles by adding a solution of 1 teaspoon of plain household chlorine bleach to a quart of water.  Swish the sanitizing solution in the bottle so that it touches all surfaces.  After sanitizing the bottle, thoroughly rinse out the sanitizing solution with water.
  • Filling containers:  Fill the bottle to the top with regular tap water.  If the water is from a municipal source you do not need to add anything else to the water.  Tightly close the container using the original cap.  Be careful not to contaminate the cap by touching the inside of it with your finger.
  • Rotating water: Replace the water every six months if not using commercially bottled water.

3.  Storing water safely

  • Store water away from light and heat.  These promote bacteria and algae growth.
  • Keep water away from stored gasoline, kerosene, pesticides, etc.
  • Water stores best at room temperature — not in the garage
  • If you have freezer space, storing some water in the freezer will provide ice to keep foods cold in the event of power loss. (Water expands when freezing. Leave space at the top of the container.)  

WATER DURING AN EMERGENCY

In an emergency if you hear reports of broken water or sewage lines, shut the water off at your incoming water valve to prevent contaminated water from entering your home. 

Take care to keep your stored water clean as you use it:

  • Containers should be closed when not in use.
  • Clean pumps carefully before installing them in large containers to pump out stored water.
  • Do not drink from containers, even individual serving bottles, if you will not finish the bottle that day.  Bacteria introduced as you drink will multiply over time.  Pour water into a cup to drink.

To improve the flavor of stored water pour it back and forth between two clean containers to add air.

Ways to make outdoor water safer

Before drinking, cooking with or bathing in outdoor water it must be treated.  Untreated water can make you very sick.  The Red Cross gives the following directions:

  • Strain it:  Pour water through paper towels, clean cloth or a coffee filter to remove suspended materials.
  • Boiling it: Bring water to a rolling boil for 1 full minute.  Cool it and pour back and forth between two clean containers to improve its taste before drinking it
  • Chlorinating it:  Using household liquid bleach that contains 5.25-6.0 percent sodium hypochlorite as its only active ingredient (see label), add 15 drops (1/8 teaspoon) per gallon to water in a large pot.  Stir and let stand for 30 minutes.  If the water does not have a slight bleach odor, repeat the dosage and let stand another 15 minutes.  If it still does not smell of chlorine, find another source of water and start over.
  • Distilling it:  Fill a pot halfway with water.  Tie a cup to the handle on pot’s lid so that the cup will hang right-side-up inside the pot when the lid is upside down without dangling into the water.  Boil the water for 20 minutes.  The water that drips from the lid into the cup is distilled.

You should not drink flood water.  Avoid water with floating material, an odor or dark color.

Water Sources  

You can use water in your pipes, hot-water tank, ice cube trays and as a last resort, water in the reservoir tank of your toilets (not the bowl).

  • Pipes:  After shutting off your incoming water valve let air into the plumbing by turning on the faucet in your house at the highest level.  A small amount of water will trickle out.  Then obtain water from the lowest faucet in the house.
  • Hot water heater:  Turn off the supply valve to the tank to prevent contamination.  Turn off the gas (on the line, not just the pilot light) or unplug electric heaters.    Let the water in the heater cool so that you will not be burned as you remove the hot water.  Turn on a hot water faucet nearby (this will open the airlock created by turning off the water intake).  Place a bucket under the drain valve and drain a gallon or two until water flows clear (no rust flakes, etc).  When clear water flows, switch to a clean, sanitized container.  (Attaching a cleaned short hose like that used on a washing machine will make collecting water much easier.)  Treat water from a water heater with 8 drops household bleach per gallon before drinking.   Refill the tank before turning the gas or electricity back on. If the gas is turned off, only a professional can turn it back on. (For directions with photographs see:  http://www.wikihow.com/Get-Emergency-Drinking-Water-from-a-Water-Heater)

Swimming pool water:  If you maintain the standard chlorine levels for domestic swimming pools (about 3 to 5 parts per million) in times of safety, then your pool water will be ready for use in an emergency with minimal treatment.

  • Maintained pool water is suitable for laundry and bathing without further treatment.
  • For drinking, boil pool water for three to five minutes to kill off any germs the chlorine hasn’t. If your pool has a low level of chlorine, add 5 to 7 drops per gallon of chlorine-based bleach after boiling and stir well.
  • Filtering pool water in a domestic jug-style filter can remove some of the harsh taste of chlorine and foreign bodies such as leaves and pool grit. However, a filter is no substitute for boiling and chlorination when it comes to killing bacteria and harmful microbes.
Click here for a printable version of this page
Emergency_03


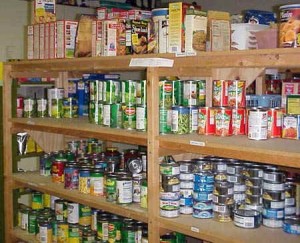
During and after a disaster access to food may be limited.  To provide for yourself and others, store enough food for two weeks.  As electricity and gas may be interrupted, stored food should require no refrigeration.  (If you have planned alternate cooking methods such as a propane stove or Dutch oven, the foods you store may require simple cooking**).   


While you may think you would be willing to eat anything in an emergency, experience shows that the reverse is true.  People are looking for food that is comforting and familiar.  Meeting your family’s tastes is probably more important than variety (plenty of peanut butter vs. storing canned hash).  Try out foods before you store them to learn if your family will eat them.  Remember children, ill or elderly people, and those with allergies or who need a special diet.  Nursing mothers may need liquid formula, in case they are unable to nurse.  This will be a high stress time; plan for simplicity.

 CATEGORY

 SELECT FOOD FROM EACH CATEGORY

QUANTITY for 2 PEOPLE

Protein Canned:  tuna, fish, beef, chicken, ham, peanut butter, nuts. 14 cans
Meals Canned:  stew, ravioli, chunky soup, chili, hash, etc. 14 cans
Vegetables Canned:  mixed vegetables, corn, carrots, peas, green beans, beets, spinach, hominy, tomatoes. 28 cans
Fruit Canned or dry:  peaches, apricots, pears, apples, prunes, raisins, oranges, pineapple, juices, etc. 28 cans of packages
Starches Canned potatoes, yams, crackers.   Instant rice**, angel hair pasta**, instant mashed potatoes**, Ramen**, crackers. 7 boxes or cans
Beans Canned:  baked beans, pork and beans, kidney beans, black beans, salad beans, etc. 7 – 14 cans
Breakfast Cereal, granola bars, Ensure type drinks, instant oatmeal**  Canned or powdered milk. Enough for 28 breakfasts
Comfort foods & drinks Cocoa mix, cookies, hard candy, lemonade mix, gum, etc.
Miscellaneous Vitamins, jam, honey

(The above chart from www.EmergencyKitchen.com  Sally and Ray Strackbein)

Remember that the quantities in the right column are based on two people sharing this food for two weeks. Fourteen cans of meat means that there would be one can of meat per day to share between two people. Twenty eight cans of vegetables would allow for two cans of vegetables per day for two people. If you have people with larger appetites in your family you will want to purchase more cans.

When accessing your food storage during an emergency, make sure that cans look to be in good condition before serving their contents.  It should have no bulging of the lid, dents, broken seals or leaking.  Open the can with a can opener.  If the food squirts out, throw the can away.  It the contents are cloudy, have a bad odor or show mold, do not eat the food in the can.  If a can passes these tests it will be safe to eat. Note:  “Use By” or “Best if Used By” dates are a suggestion for when the food will be at its best. Food is generally safe if consumed past this date, but may have deteriorated in flavor, texture, or appearance.  Foods with low acid content, such as meat and vegetables, can be stored for two to five years. Foods with high acid content should be kept for a maximum of 18 months.

Click here for a printable version of this page

Emergency_11


In an emergency situation, food should be prepared and eaten in the cleanest conditions possible to prevent the spread of disease. In addition, make sure food is safe and will not cause food poisoning.


Food Should be Clean

  • Wash your hands before preparing food.  Wash your hands before eating.  Do not eat with your hands.
  • Carefully clean food preparation areas and utensils.  Wash them with soap and SAFE water.  Rinse in/with a sanitizing solution of 1 tablespoon unscented chlorine bleach in 1 gallon of warm (not hot) water.  Air dry.

Food Should be Safe

Fresh Food

  • Wash raw fruits and vegetables with safe water before eating
  • Do not eat food with mold on it.  Visible mold is the “bloom.”  Invisible fibers can be throughout the food.  Mold may contain harmful toxins or cause allergic reactions.

Shelf Stable Food:

These foods are canned or otherwise packaged and do not need refrigeration until they are opened.  Remember:

  • Canned foods should be eaten within an hour after opening.  Uneaten food should be thrown away.
  • Make sure the can looks in good condition before serving the contents.  It should have no bulging of the lid, dents, broken seals or leaking.  Open the can with a can opener.  If the food squirts out, throw the can away.  It the contents are cloudy, have a bad odor or show mold, do not eat the food in the can.  If a can passes these tests it will be safe to eat even it has passed the expiration date by a year.  However, DO NOT EAT TOMATO PRODUCTS FROM A CAN IF THE DATE HAS PASSED.
  • Crackers, cake mixes and other items containing oil may go rancid causing an off taste.  While they will not cause immediate illness, they can have long term effects and should only be eaten for a short time to prevent starvation.

Refrigerated and Frozen Foods

During an electrical outage, refrigerated or frozen food needs special handling.  Making some preparations beforehand will help preserve these foods safely.

Before the outage:

  • Have one or more ice chests on hand.  (Styrofoam coolers will work.)
  • Put appliance thermometers in both the refrigerator and freezer.  These will help determine food safety when the refrigerator and freezer are later opened.
  • Store bags of ice or frozen jugs of water in freezer.  This helps freezer stay cold while power is out and cools ice chests if the outage is long term.  (Leave a one-inch space in top of jugs as water expands when it freezes.)
  • Group food together in the freezer.  This helps food stay cold longer.  Fill empty areas with ice or frozen water containers so freezer stays cold longer.

During the outage:

  • Do not open your refrigerator or freezer.  An unopened refrigerator will keep foods cold enough for four hours.  An unopened freezer will keep food safe for 24 hours if it’s half full and 48 hours if it’s full.
  • If the power outage continues for more than 4 hours, pack such items as dairy products, meats, eggs and leftovers in your cooler packed with ice.  (In some cases this will require opening your freezer to get the ice which will significantly shorten how long the freezer will stay cold.  A better course may be to eat what is in your refrigerator and leave the freezer closed.)
  • If the power outage continues beyond 24-48 hours (depending on how full freezer is), prepare another cooler with ice and transfer your freezer items to the cooler.

After the outage:

  • You can’t rely on the appearance or order of food to determine it’s safety.  Never taste food to determine its safety!
  • If an appliance thermometer was kept in the freezer check the temperature when the power comes back on.  If the freezer thermometer reads 40 degrees or less, the food is safe and can be refrozen or cooked and eaten.
  • If the food contains ice crystals, it is safe to refreeze or cook.
  • If you plan to eat refrigerated or frozen meat, poultry, fish or eggs if it is still at safe temperatures, it’s important to cook the food to the proper temperature to destroy food-born bacteria.  Don’t short cut cooking to save fuel.
  • Keep in mind that perishable food such as meat, poultry, seafood, milk, and eggs which are not kept adequately refrigerated or frozen may cause illness if consumed, even when they are thoroughly cooked.


Special Note:  Food Exposed to Flood Water

Food that has been in contact with flood water is almost always contaminated and should be thrown out.  Discard any food that has screw on caps, snap lids, pull tops, and crimped caps (soda bottles) as these are not water proof.  Also discard cardboard juice/milk/baby formula boxes and home canned foods if they have come into contact with flood water.

Commercially canned food may be safe.  If the cans are not bulging, dented or rusted do the following:

  • Remove the labels.
  • Wash the cans to remove any sign of dirt.
  • Soak the washed cans in a solution of 1 cup bleach to 5 gallons of water for 15 minutes.
  • Remove the cans from the solution and let them air dry for at least one hour.
  • Re-label the cans with a marker.  Include the expiration date.

Plastic utensils, wooden cutting boards, baby bottles and nipples and baby pacifiers that have been exposed to flood water contamination should be thrown out.  They cannot be adequately sanitized for future use.

Click here for a printable version of this page

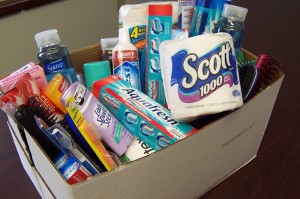
Emergency_01During an emergency, staying clean and healthy despite less than optimal conditions contributes to maintaining health and a sense of well being.  Thus, non-food items will be just as important as food and water. They will allow you to keep yourself and your surroundings clean, healthy and more comfortable.  Every household has different needs; be sure to consider your unique requirements.                                                             

Clean While “Camping”

With the possibility of water & sewer service being disrupted, some supplies will help ease daily tasks and contribute to a healthy environment.

  • Store two dishpans, one for dishes and one for laundry.  These may be necessary if you cannot use the drains due to interrupted sewer service.
  • Bleach is essential for purifying water, disinfecting, for rinse water when washing dishes (2½ tsp. of bleach per gallon of purified water) and for odor control in emergency toilet.
  • Store these items to clean and disinfect – dish soap, liquid laundry soap, Lysol.
  • Disposable dishware and utensils save water and are fresh for each use.
  • Tissues and toilet paper are essential for sanitation.  Paper towels will also be helpful.
  • Refillable water container with spigot for hand washing station.  Store paper towels for drying hands and cleanup.
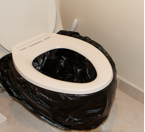
  • Garbage bags are essential for keeping trash contained and your area clean.  Also, if sewer lines are broken, toilets cannot be flushed and so cannot be used as usual.  However, a toilet can be emptied of water and lined with two 8 gallon heavy duty garbage bags.  A 1:10 bleach/water solution is added to the bag after each use.  Daily, bags are tightly closed and collected in a large garbage can.  Eventually the city will provide a means of disposal.

Summary chart for non-food items

Consider storing these items together in large covered tubs so they will be ready for use.

Hand sanitizer Nail clippers and file Paper towels Disinfectant cleaner
Toothpaste Sunscreen Dish soap Container with spigot
Toothbrushes and floss Insect repellant Plastic dishpans Buckets
Shampoo Feminine items Paper plates and cups Kitty litter or sawdust
Pump soap Disposable wipes Plastic utensils Garbage bags, L and S
Deodorant Toilet paper Bleach (unscented) Large trash can and lid
Razors/shaving cream Kleenex Liquid laundry soap Special needs supplies
Can opener Lighter or matches
Click here for a printable version of this page

Emergency_10


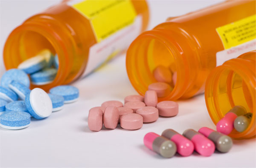
During an emergency, it will be important for you and your family to have a supply of the prescription medications you take on a regular basis.  Because you may not have easy access to your doctors and pharmacy, you may build up an emergency supply as listed below.


KAISER’S POLICY for GETTING and EMERGENCY SUPPLY of MEDICATIONS

Kaiser does not allow “stockpiling” of medications (by ordering an extra supply); nor will they allow the patient to pay out of pocket for additional medications.  However, the patient may accumulate medications by ordering in advance of the due date.

Kaiser’s regular prescriptions are given for 100 days.  Extra medications can be ordered as follows:

  • If a patient receives medications in the mail, he may order again when 2/3 of the prescription has been used (after 67 days).
  • If a patient picks up his prescriptions, he is allowed to order the next prescription 10 days in advance of when his prescription will be gone.

Obviously, this takes some calculating and planning.  But over time, a “cache” of medications can be established.   For controlled medications (painkillers), these rules do not apply.

(Kaiser does have provisions for emergencies so that medications will be available.)


NON-KAISER WAYS to OBTAIN an EMERGENCY SUPPLY of MEDICATIONS

  • Easiest way:  Pay out-of-pocket for all non-controlled medications and get your supply all at once.  (Check with your pharmacist as to see how much extra this will cost you.)
  • More involved way:  According to what your insurance company allows, order the medications early (typically you can order a week in advance).  Each month, take the reserved pills first, then use the pills just picked up (always storing the freshest pills).  If you are conscientious, in five months or less, you will have an extra 30-day supply.


             Take Reserve      New        Pick up after      In
    Month       First      Prescription      23 days       Reserve
       #1        --             30           -23             7
       #2         7            +30           -23            14
       #3        14            +30           -23            21
       #4        21            +30           -23            28
       #5        28            +30           -23            35
       #6     Reserve    Save for next month ->    ->   1 month supply

Non Prescription Medications

Consider the over-the-counter medications you use.  Having an extra supply of these will also be helpful.  Be sure to rotate your supply as you use these medications.

Expiration Dates

Some medications are good well beyond the listed expiration date.  Check with your pharmacist to find out about the actual longevity of the medications you take.

Click here for a printable version of this page
Emergency_07


In any emergency a family member or you yourself may suffer an injury. If you have these basic first aid supplies you are better prepared to help your loved ones when they are hurt.

Knowing how to treat minor injuries can make a difference in an emergency.  You may consider taking a first aid class, but simply having the following things can help you stop bleeding, prevent infection and assist in decontamination.


Recomended Supplies

  • Two pairs of Latex or other sterile gloves if you are allergic to Latex
  • Sterile dressings to stop bleeding
  • Cleansing agent/soap and antibiotic towelettes
  • Antibiotic ointment
  • Burn ointment
  • Adhesive bandages in a variety of sizes
  • Eye wash solution to flush the eyes or as general decontaminant
  • Thermometer
  • Prescription medications you take every day such as insulin, heart medicine and asthma inhalers. You should periodically rotate medicines to account for expiration dates.  (Check with your pharmacist in advance to see which of your medications are okay to use beyond the date listed.)
  • Prescribed medical supplies such as glucose and blood pressure monitoring equipment and supplies

Non-prescription drugs

  • Aspirin or non-aspirin pain reliever
  • Anti-diarrhea medication
  • Antacid
  • Laxative
  • Others medications regularly used by your family

Other first aid supplies

  • Scissors
  • Tweezers
  • Tube of petroleum jelly or other lubricant

(The above list was prepared by FEMA and was found at http://www.ready.gov)

Consider adding

  • Good first aid book
  • Triangular shape fabric to make a sling and strips of fabric for applying a splint. These can be made from an old sheet.
  • Needles for removing splinters and safety pins for bandages
  • Plastic box to keep items safe

Gather any splints, braces, crutches your family may have collected over the years into one place so you won’t have to be hunting for them at the time of the emergency.

Click here for a printable version of this page
Emergency_06

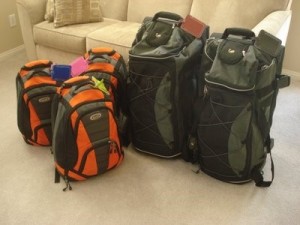
There are many lists for preparing a 72 Hour Kit.  The list below is a “meshing” of several lists.  You may not want everything on the list or you may want to add additional items suited to your needs.  A good exercise would be for you to walk through your home and determine what you need to take with you if you had to live away from your home for three days.    

Remember that in an emergency you may need to grab your kit and go quickly.  Pack so that you can carry or pull your bag as you leave.  For families, divide the supplies among family members.

Because you may be away from home when an emergency occurs, think about getting kits for your car and office.

Kit_Box

Basic Supplies

  • Water:  1 gallon per person per day for 3 days
  • Food:  at least 3 days supply, non perishable
  • Manual can opener if needed
  • Radio:  battery/hand crank, extra batteries
  • Flashlight or headlamp, extra batteries
  • First aid kit and book
  • Prescriptions (7-14 days) and glasses
  • Whistle to signal for help
  • Dust mask
  • Moist towelettes, toilet paper, garbage bags and  ties (for personal sanitation)
  • Wrench or pliers to turn off utilities
  • Duct tape and plastic sheeting (for sheltering in place or in the outdoors)
  • Scriptures
  • Cell phone charger, inverter or solar charger
  • Local maps, compass

For Baby

  • Formula and water to mix
  • Diapers
  • Bottles
  • Powdered formula – nursing mothers may find they are unable to nurse
  • Medications and diaper rash ointment
  • Baby wipes

Consider Adding

  • Cash in small bills and change (ATM’s may not work)
  • Sleeping bag or warm blanket for each person
  • Complete change of clothing:  long sleeved shirt, long pants, sturdy shoes, socks and underwear
  • Jacket, hat and gloves, rain poncho
  • Plain household bleach and dropper for water purification and to disinfect
  • Matches or lighter
  • Personal hygiene items
  • Hand sanitizer, soap, shampoo, toothbrush and paste, chap stick, tissues , feminine supplies
  • Sunscreen, insect repellent
  • Sunglasses, contact lenses and supplies
  • Mess kits, paper cups, plates, paper towels and plastic utensils
  • Paper and pencil for leaving messages
  • Books, games, etc. for children

Copies of Important Papers

Identification, proof of address, bank account records, credit card numbers, insurance policies, medications list and prescription numbers, phone numbers of family contacts, passports and birth certificates.

REMEMBER TO PLAN FOR YOUR PETS!

  • Food and water for at least 3 days for each pet
  • Food and water bowls and a manual can opener
  • Litter, litter box or newspapers, paper towels,plastic trash bags, grooming items, bleach
  • Medications, medical records in a waterproofcontainer, first aid kit and pet first aid book
  • Sturdy leashes, harnesses and carriers to transport pets safely and to ensure that your pets cannot escape.  A carrier should be large enough for the animal to stand comfortably, turn around and lie down.  You may need blankets or towels for bedding and warmth and other special items.
  • Pet toys and the pet’s bed, if you can easily take it, to reduce stress.
  • Current photos and descriptions of your pets to help others identify them in case you and your pets become separated and to prove that they are yours.
  • Information on feeding schedules, medical conditions, behavior problems and the name and telephone number of your veterinarian in case you have to board your pets or place them in foster care.
Click here for a printable version of this page


Emergency_09You can soften the effect of a power outage due to an emergency by preparing ahead.  Most families will need alternate lighting and ways to keep warm.  Some families may also need to consider medical equipment that requires power or medications that need to be kept cool.


Lighting

Light provides safety, convenience and comfort.  Emergency sources may be:

  • Flashlights or head lamps:  Provide directional rather than broad area lighting.  Most flashlights now use LED “bulbs” which last much longer than incandescent bulbs.  They also use less power.  Light output is measured in lumens.  Lower lumens provide less light but require less power.  Your flashlights should provide enough lumens to be functional for your needs.  Most flashlights need batteries.  A quality solar power flashlight requires no batteries and costs about $25.  Less expensive solar flashlights and flashlights that charge by shaking usually don’t provide enough light.   Crank-powered flashlights work for about 20 minutes after one minute of cranking.
  • Oil lamps:   Provide broad light in a room.  Most burn lamp oil (K-Mart, Walmart or a drugstore).  Fire is a risk from the flame.  Lamp oil is extremely toxic – keep away from children.
  • Battery powered lanterns:   Provide broad light in a room.   No danger from open flame.  Batteries are required for most, but solar models are also available.
  • Light sticks:  These cost little and store easily but they are a one use item. Breaking the glass encased in the plastic stick mixes chemicals which provides 8-12 hours of soft light.
  • Solar garden lights:  This may be kind of awkward, but if brought inside they can provide light then be recharge at the window or outside the next day.
  • Batteries:  In an emergency batteries are scarce.  Store extras.  Alkaline batteries are less expensive, but lithium batteries last longer.  Batteries do expire; most now have an expiration date showing how long they remain fresh if unused.

Warmth 

We live in a moderate climate, but imagine being outside 24/7 in January.  While we may be in our homes during a disaster after a couple of days of no power the inside will be as cold (or colder during the day) as the outside.   In the winter that may mean an indoor temperature in the 40’s – 50’s.

  • Sleeping bags:  Would augment the bedding that is usually sufficient in our heated homes.  They would also be useful if evacuating to a shelter were necessary.  Extra blankets could substitute.
  • Clothing:   Wearing layers of clothing is an effective way to stay warm.  Stocking caps (the greatest percentage of body heat is lost through the head) can be worn during sleep and keep ears warm during the day.  Gloves, the protective/work type, but also gloves for warmth.  Consider a pair of thermal underwear for each family member.

PLEASE NOTE:  Do not use propane or charcoal stoves when cooking indoors or to heat the inside of your home.  These give off carbon monoxide which can build up and cause sickness or even death.

Click here for a printable version of this page
Emergency_08

There are two reasons you may need an emergency toilet:

  1. The municipal water system has been damaged and there is no water coming into your house.  If you have a large supply of water (swimming pool), you can continue to use your toilet and flush it with buckets full of that water dumped into the toilet bowl.  However, you should consider whether or not this water could be put to better use.
  2. There has been damage to the sewer system.  In this case, you will need to use emergency toilets.

To turn your toilet into an emergency toilet you will need 

  • Heavy duty 8 gallon garbage bags to fit your toilet bowl– at least 28
  • A scoop and bucket
  • Latex gloves
  • Twist ties or another reliable way to close up the bags after use
  • Absorbent material:  saw dust, kitty litter, ash from a fireplace
  • Two 2 liter bottles, one for a bleach/water solution, and one for the absorbent material you choose to use.
  • Air freshener
  • Hand sanitizer or bleach diluted 1 part bleach to 10 parts water to clean hands
  • Large outdoor garbage can with tight lid
  • You will also need toilet paper.

Steps to setting up the toilet

  1. Put on latex gloves to protect your hands.  Using a disposable cup for a scoop, empty the water from a toilet into the bucket.  Pour the water into a trash bag, tie off and place in garbage.
  2. Line the toilet bowl with two heavy-duty 8 gallon garbage bags.
  3. Place kitty litter, sawdust or wood ashes in the bottom of the bag.
  4. Remove and dispose of latex gloves.

Using the toilet

  1. After use, cover solid waste with a layer of the absorbent material.  To reduce odor after each use, sprinkle waste with a mixture of one part household chlorine bleach mixed with ten parts water.
  2. CLEAN HANDS THOROUGHLY.  Use soap and water if possible, if not, use hand sanitizer or a 1 part bleach to 10 parts bleach/water mixture.
  3. Each day the bags should be tightly closed (using a twist tie or equivalent) and removed to an area where animals cannot get to them.  A large outdoor garbage can with a lid is ideal.

Cities will eventually make arrangements for this type of waste to be picked up.  In cities and towns, do not bury it in the yard.  Listen for announcements to determine when you may use your sewer again.

___________________________________________________________________________

EMERGENCY TOILETS MAY ALSO BE PURCHASED AT EMERGENCY PREPAREDNESS WEBSITES such as www.beprepared.com and www.yoursafetyplace.com.


Click here for a printable version of this page
In emergency situations, there may be times when it is necessary to turn off you’re the gas, water or electricity coming into your house.  Make sure you know in advance where on your property the gas valve, main breaker switch, water meter box and main water are located.

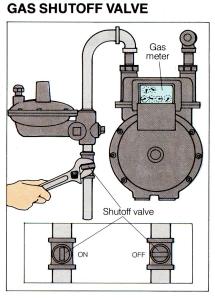
gas shut off valve

The gas meter and gas shutoff valve are usually located on the side or in front of the house or building.

In the event of an emergency, do not turn off the gas unless you smell it or hear it escaping, see a broken gas line or if you suspect a gas leak.

If you shut off the gas, there may be considerable delay before PG&E can turn your service on.  Once the gas is shut off at the meter, do not try to turn it back on yourself.  If the gas service shutoff valve is closed, PG&E should perform a safety inspection before the gas service is restored and the appliance pilots are lit.

TO SHUT OFF THE VALVE:  Use a wrench to give the valve a quarter turn in either direction.  The valve is closed when the tang (the part you put the wrench on) is crosswise to the pipe.

Check this valve periodically by seeing if the tang will turn easily … just turn it a tiny bit to check.  If it is “stuck,” call PG&E to come and service it.

_________________________________________________________________________________

 WATER METER VALVE

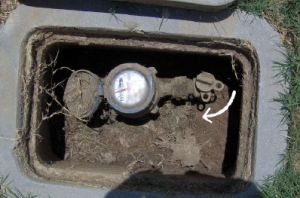
HPIM0653.JPG

If a water pipe is broken, water can be turned off at the water meter box.  Use tool available at hardware store to turn the valve clockwise until the two small holes are aligned. You can also use a crescent wrench tightened around the valve. Place a screwdriver through the hole at the top of the wrench and turn in a clockwise direction. Turn counterclockwise to turn the valve on.

_________________________________________________________________________________

MAIN ELECTRICAL BREAKER SWITCH

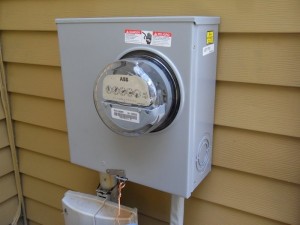
electrical service boxMain Breaker switch

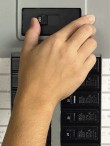
If it is necessary to turn off electricity to the house, go to the main electrical service box and flip off the main breaker switch.